In this chapter I am going to talk about how to define, program and deploy "Menu Items" in Sharepoint 2010. Menu Items are custom actions incorporated into the built-in Sharepoint 2010 user interface. As examples, the Site actions menu is built from a number of built-in, context-sensitive actions that appear as menu item links.
Sample of Menu Items:

A menu item is a basic XML document inside of the XML element file. This is attached into a feature and it can be deployed with Visual Studio 2010.
Sample of an elements.xml (Click in the code to make it bigger)

As you can see the element "CustomAction" is the one who takes control of the Menu Item, so It is very important to understand what we can do with it before going to the our little example. This is how basically we can extend our menu item:
  RequiredAdmin = "Delegated | Farm | Machine"
  ControlAssembly = "Text"
  ControlClass = "Text"
  ControlSrc = "Text"
  Description = "Text"
  FeatureId = "Text"
  GroupId = "Text"
  Id = "Text"
  ImageUrl = "Text"
  Location = "Text"
  RegistrationId = "Text"
  RegistrationType = "Text"
  RequireSiteAdministrator = "TRUE" | "FALSE"
  Rights = "Text"
  RootWebOnly = "TRUE" | "FALSE"
  ScriptSrc = "Text"
  ScriptBlock = "Text"
  Sequence = "Integer"
  ShowInLists = "TRUE" | "FALSE"
  ShowInReadOnlyContentTypes = "TRUE" | "FALSE"
  ShowInSealedContentTypes = "TRUE" | "FALSE"
  Title = "Text"
  UIVersion = "Integer">
For more information about every single CustomAction field, go to the Microsoft Website , Click here.
Let's go to start building a Menu Item. This Menu Item will be displayed under "Site Actions" and the main mission of this link will be related with the use of the current DMS site. It will basically display the list of the Top users who have been using our DMS site. This information will be very useful for secretaries who are dealing with documents all the time and need to know who has been accessing to the DMS, date + time.
The new menu it should look like this, as you can see there is a new item called "Top DMS Users":
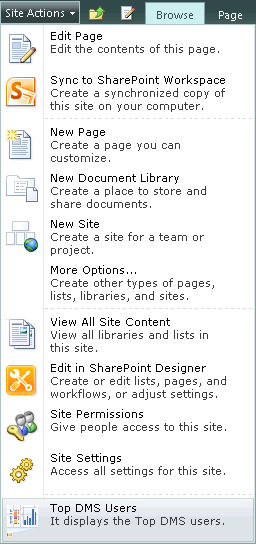
When you click on "Top DMS Users" this screen should be displayed:

1- Open Visual Studio 2010.
2- File -> New -> Project -> Sharepoint -> 2010 -> Empty Project.
3- On the name text box type TopDMSUsers and click enter.
4- Deploy as a farm solution, and point the new project where you want to add the menu item.
5- On teh emty project Add->New Item->Empty Element and call it TopDMSUsers_Feature.

6- On the project, go to Elements.xml and add this code. (Click in the image if you can not see it properly)

8- This is how the Solution Explorer should look like:

9- Build and Deploy.
10- If you go to "Site Actions" you should be able to see the new Item.
Tips
Menu Items are deployed with features, so as soon as you deactivate the feature the Menu Item will disappear from the menu.
Conclusion
This small exercise has showed us how far we can go with the Sharepoint User Interface customization. In the next chapter we will learn how to interact with another members of the user interface.
