In the second part of the series we will follow the process of how to create "Columns" in a content type. "Columns" will become of of they key parts of the Document Management System as it will be the fastest way of searching documents. Think in "Columns" as fields, every document will be the document itself (.doc) plus a bunch of fields. These fields can be customize by adding the out-of-the-box ones you need or by creating your own ones.
In this part we will concentrate in adding the out-of-the-box ones, leaving the custom ones for the next chapter.
1- Go to Site Actions -> Site Settings -> Site Content Types.
2- Look for "Custom Content Types".

3- Click on "Bill".
4- You should reach this screen "Site Content Type Information".

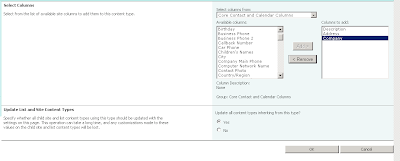
5- Click "Add from existing site columns"
6- Select "Select columns from:" -> Status indicators, and in "Available columns", select Description and click in Add. Now select "Core contact and Calendar Columns" and select Address and Company. Click on "Ok".
7- If you add a new "Bill" you should be able to see the columns. Don't forget to update the view to see the columns (if you to see them).
Conclusion
Columns in a Sharepoint DMS is one of the most powerful tools to manage the documents.
Bugs related
1- When you try to create a new document from "Shared documents"->"Documents" (ribbon)->"New Document"->the name of your document. you get this error:
'New Document' requires a Microsoft SharePoint Foundation-compatible application and web browser. To add a document to this document library, click the 'Upload Document' button.
Work around from Microsoft:
Click here or follow these instructions:
1- Start OneNote 2010.
2- On the File tab, click New.
3- Under Store Notebook On, click Network.
4- Type a name for the notebook in the Name field.
5- Under Network Location, select the SharePoint location where you want to add the OneNote notebook.
6- Click Create Notebook.
2- If this does not work, the problem could be in your browser, Internet Explorer 8. Apparently there are some tasks that Internet Explorer 8 64bit can not perform like the 32bit version. Internet Explorer 32bit supports all the tasks. I found this problem in the 64bit version.
Click here for a full list of browsers and Sharepoint 2010 limitations, this following list is just for Internet Explorer 64bit:
Feature |
Limitation |
Connect to Outlook, Connect
to Office, and Sync to SharePoint Workspace |
Works with an ActiveX control
and the stssync:// protocol. Therefore, functionality may be limited without
an ActiveX control, such as the one that is included in Microsoft Office
2010. The feature also requires an application that is compatible with the
stssync:// protocol, such as Microsoft Outlook. |
Datasheet view |
Requires a 64-bit ActiveX
control. Microsoft Office 2010 does not provide a 64-bit version of this
control. |
Edit in Microsoft Office
application |
Requires a 64-bit ActiveX
control. Microsoft Office 2010 does not provide a 64-bit version of this
control. |
Explorer view |
Removed in SharePoint
Foundation 2010. Libraries that have been upgraded from earlier versions of
SharePoint Foundation 2010 may still have Explorer views and these may not
work. |
Export to Excel |
Downloads a file with an .iqy
extension to the Web browser. If Microsoft Excel is not installed, and if no
other application is configured to open this file, then this feature will not
work. |
File upload and copy |
Requires a 64-bit ActiveX
control. Microsoft Office 2010 does not provide a 64-bit version of this
control. |
Microsoft InfoPath 2010
integration |
Requires a 64-bit ActiveX
control. Microsoft Office 2010 does not provide a 64-bit version of this
control. |
Microsoft PowerPoint 2010
Picture Library integration |
Requires a 64-bit ActiveX
control, such as the one that is delivered in Microsoft Office 2010. The user
can use the following workarounds when no control has been installed: ·
If a user wants to upload multiple pictures in a picture
library, the user must upload one picture at a time by using Upload.aspx. ·
If a user wants to edit a picture in a picture library, the user
must download the picture, edit it, and then upload the picture to the
picture library. ·
If a user wants to download more than one picture from a picture
library, the user must download one picture at a time by clicking on the
picture link. |
Microsoft Visio 2010 diagram
creation |
Requires a 64-bit ActiveX
control. Microsoft Office 2010 does not provide a 64-bit version of this
control. |
New Document |
Requires a 64-bit ActiveX
control. Microsoft Office 2010 does not provide a 64-bit version of this
control. Although the New
Document command may not work, you can use the Upload
Document functionality. If you install and configure Office Web Applications
on the server, the New
Document command works, and you can create an Office document
in your browser. |
Send To |
Can leverage a 64-bit ActiveX
control. Microsoft Office 2010 does not provide a 64-bit version of this
control. Without the control, files cannot be sent from one SharePoint farm
to another SharePoint farm. However, files can still be sent from one site to
another site. |
Signing Forms (InfoPath Form
Services) |
Requires a 64-bit ActiveX
control. Microsoft Office 2010 does not provide a 64-bit version of this
control. |
Spreadsheet and Database
integration |
Require a 64-bit ActiveX
control. Microsoft Office 2010 does not provide a 64-bit version of this
control. The user can use the following workarounds when no control has been
installed: ·
If a user wants to edit a document, the user must download the
document, edit it, and then save it back to the server. ·
In a list that requires a document to be checked out for
editing, a user must use the Edit
menu to check out the document, edit it, and then check it in by using the Edit menu. ·
Export to spreadsheet. Users can export a SharePoint list as a
spreadsheet by clicking Export
to Spreadsheet on the List
tab on the ribbon. |
Web Part to Web Part
Connections |
May require deactivation of
browsers pop-up blockers for SharePoint sites. |


