Remember The availability of a site column follows the site hierarchy in SharePoint, which means that a site column is available on a site and all sites beneath that site. A site column is not available on SharePoint sites above the site on which the site column is created.
We will continue with out little sample, the "Bill" content type
1- In your SharePoint installation find the site where you want to add the column and click on there
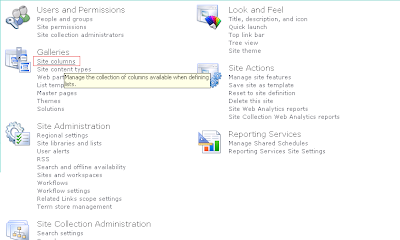
2- On the Site Actions menu->Site Settings->Site columns.

3- On the Site Column Gallery page, click Create.

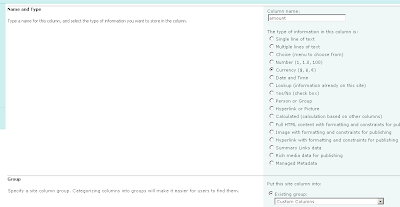
4- On the New Site Column page, enter a Name, "amount" and select a Type for the site column, "Currency".

5- On the New Site Column page, select Custom Columns from the Existing group drop-down list box.
6- Click Ok.
7- On the Site Actions menu->Site Settings->Content Types.
8- Click on "Bill".
9- Click on "Add from existing site columns".
10- Select on "select columns from:"-> Custom columns and then select amount. You can add it now. Click ok.

11- Your new column is ready to use!.
This tool is even more powerful than the out-of-the-box columns, but be sure you plan everything properly before using it, you could end having few surprises.
1 comment:
The information you have deliver here is really useful to make my knowledge good. Thanks for your heavenly post. It is truly supportive for us and I have accumulated some essential data from this blog.
Document Management Software India
Document Management Software Chennai
Document Management Software
Electronic Document Management System
Post a Comment